
How to Customize Your Substack Website
Make your Substack publication look unique, and help your readers find their way around

This post was brought to you by my 8 Essential Canva Templates for Substack - everything you need to create a professional, polished newsletter in minutes, not days.
Updated: March 2026
Hi there,
This post is about customizing the homepage and website of your Substack publication.
Get a unique-looking website for your Substack publication (step by step)
Step 1: Activate ‘Custom Theme’ in your publication settings
First, make sure your publication is set to ‘Custom Theme’, which, as of October 2025, is not the default for new publications (but that could change anytime… Substack developers are constantly fiddling with settings)
To deactivate ‘Match profile’, follow the steps below.
Go to your publication dashboard. To get to your dashboard, look for a button that says ‘Dashboard’ somewhere on your screen while logged into Substack. Or go to https://substack.com/settings and look for the ‘Dashboard’ menu item.
💡 Hint: If there’s no dashboard option, you may not have a publication
Once inside the dashboard, find ‘Settings’ near the bottom left corner of the screen. Click ‘Settings’.
In Settings, scroll to ‘Website’.
In ‘Website’, find the button labelled ‘Match Profile’. Click this button to see a two-option dropdown list.
⚠ If you don’t see ‘Match profile’ you’ll see ‘Custom Theme’ and you can jump to Step 2
Deselect ‘Match profile’ by clicking ‘Custom theme’.
‘Custom theme’ is now active and you will be able to edit the name and description of your publication, upload a logo and change the look and feel of your webpages.
Step 2: Access Website Customizations
You can get to Substack’s website theme editor two ways:
In your publication dashboard, scroll down the menu on the left to ‘Creator tools’ (it’s below ‘Audience’) and click ‘Website editor’; or
In your publication settings, scroll to ‘Website’, then click ‘Go to website theme editor’
Both paths will take you to the website editing page.
Publication dashboard > Creator Tools > Website editor
or
Publication dashboard > Settings > Website > ‘Go to website theme editor’ [button]
Reminder: To get to your publication dashboard, look for a button that says ‘Dashboard’ somewhere on your screen while logged into Substack. Or go to https://substack.com/settings and look for the ‘Dashboard’ menu item. If you don’t see a dashboard option, you may not have a publication
Step 3: Heed my warning
Before you start playing around with the look and feel of your publication, read this warning (from me):
While it’s nice to have a good-looking online publication, it is not as critical as you might think when you are first starting out. In fact, most new online creators spend way too much time and effort worrying about the design aesthetics of their online spaces — time that should be spent creating high-quality content for their subscribers.
Don’t let customizations become ‘busy-work’ and procrastination for you!
Step 4: Set your color and fonts (or not)
On the right-hand side of the Website editor page you will see a place to choose colors and typography.
You can choose
Background color
Accent color - this is the color of your subscribe buttons and links
Post title font (‘Typography’)
Do you need to change any of these? No, you do not. Your website will be fine even if you change nothing. Although it is cool to switch the color of the buttons to something unique.
Step 5: Customize your homepage (or not)
There’s no need to customize your homepage layout, it will look just fine without any tweaks.
But if you do want to change it, here’s how:
Find ‘Layout’ on the right side of the website editor page, under colors and typography (you may need to scroll)
and toggle on ‘Use custom body layout’.
Mouse over each part of the page in the website editor window and choose from the options that appear. When you’ve finished with each element click ‘Save’.
Publication dashboard > Creator Tools (scroll to find this, it’s below ‘Audience’ in the left menu) > Website editor > Use custom body layout [toggle] > Select the part of the page you want to edit > Select options > Save [button]
OR
Publication dashboard > Settings > Website > ‘Go to website theme editor’ [button] Website editor > Use custom body layout [toggle] > Select the part of the page you want to edit > Select options > Save [button]
Customization features explained
Header
The Header section is the top of your homepage. When you click ‘Header’ on the Website editor page you can upload or change your logo and Wordmark, and choose options for the layout of the header.
Most publications use the ‘standard’ layout and the ‘text’ option for navigation.
💡Hint: A Wordmark is an image-based depiction of a publication name. Read this post to learn more about Wordmarks.

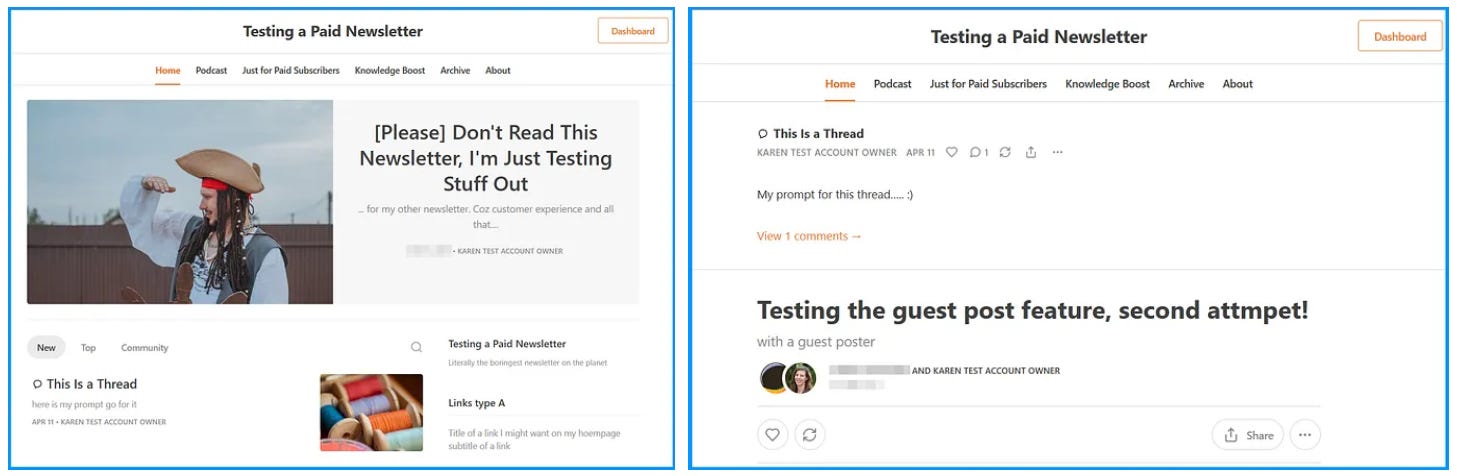
Hero section
The Hero section is the top of your homepage. Substack has various layout options for this section including feature, newspaper, magazine and media feature. I recommend using a layout that allows for a large post across the top of the page.
Most publications use the ‘feature’ layout.
What is a ‘Feature’?
The feature layout showcases a pinned post at the top of your publication’s homepage. I recommend using a layout that allows for a large pinned post.
The pinned post can be used to explain your publication to new visitors. I call this a ‘Hero post’. When done well, such posts are high-converting — that is, they are good at converting curious visitors to into subscribers.
Pinned posts
A pinned post is a post that you have manually chosen to stay at the top of your homepage. To pin a post to your homepage, find the post in the list of published posts in your dashboard, click the three little dots at the right, then choose ‘Pin to homepage’ from the dropdown list that appears.
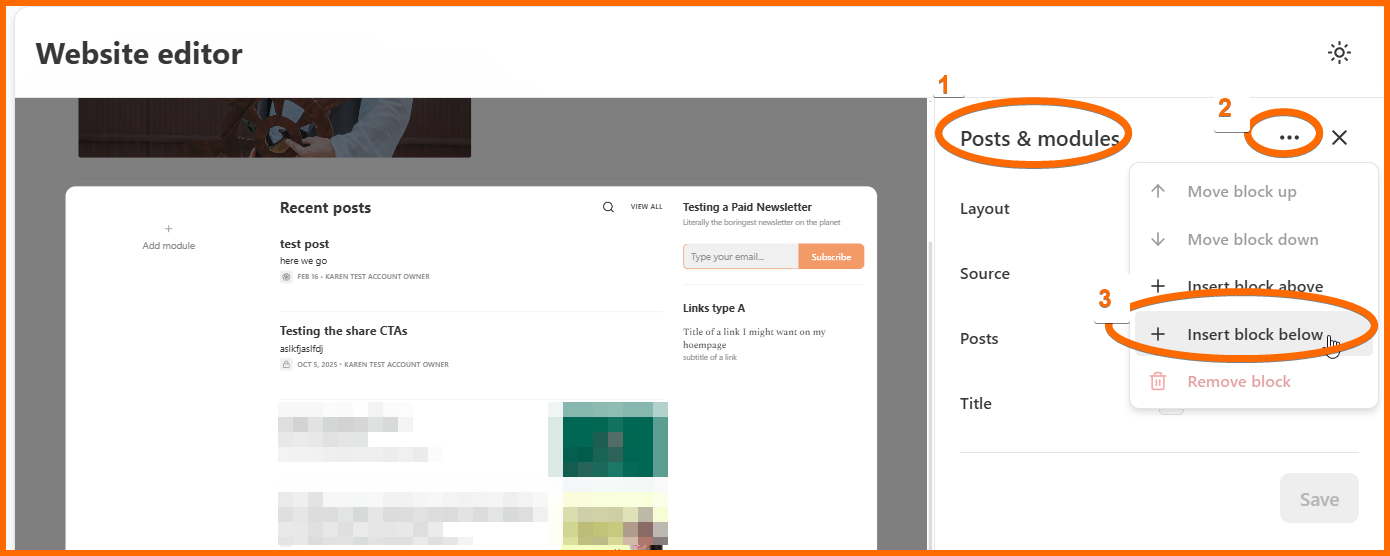
Posts & modules
The posts & modules section is the main body of your homepage, where your recent posts are displayed.
You can choose from a list or grid layout.
You can also choose to showcase posts with a particular tag or from a particular section of your publication. This is useful if want all posts on a particular topic to be grouped on your homepage. Learn more about tags and sections here and here.
You can override the title of a group of posts by selecting the ‘Use override’ checkbox. For example if you don’t want your list to be titled ‘Recent Posts’ you can choose some other title.
👉 Top tip: You can have multiple post blocks on your homepage. To add a second block, start in the Post & modules editing window, then click the three dot menu next to ‘Posts & modules’ and select ‘+Insert block below’ from the dropdown list.
If you don’t see ‘Posts & modules’, check you have toggled on ‘Use custom body layout’, as described at the beginning of Step 5.
Footer
You can change the layout of your homepage footer, add a custom color and insert social media links if desired.
Most publications do not have a custom footer.
Subscribe CTAs
To add a subscribe CTA (call to action) – known as a ‘Subscribe block’ – use the ‘Insert block below’ feature in the Post & modules editing window by clicking the three dot menu next to ‘Posts & modules’, as shown in the screenshot above.
You’ll be given the option to add a ‘Subscribe block’ and an opportunity to write a custom message.
💡Hint: Different people see different messages on your homepage, depending on whether they are non-subscribers, free subscribers or paid. You can create custom messages for each.
Homepage Links
It’s possible to add a small block to your homepage with labelled links to specific webpages.
This is NOT done from the Website editor, but from Publication settings.
Publication dashboard > Settings > (scroll to) Pages and navigation > Homepage links > Edit [button] > Add link [button]
Once you have created the homepage links, you will see them in the Posts & modules block in the website editor. You can then click and drag to reposition them on the page.
Advice from the trenches
Design decisions are a top procrastination activity on Substack. If you find yourself spending more than ten minutes trying different design features, colors and fonts, you are procrastinating! Stop and come back to it later with fresh eyes.
Which layout is best?
The best way to know how each layout will suit your publication is to try it out. Substack’s website theme editor has a preview so you can see how changes will look before you commit to a new look.
You’ll need at least 5 published posts to get a good preview of the layout. If you have fewer than 5 posts, the layouts might all look very similar.
Most successful publications use an editorial layout like a newspaper or magazine. New publications can use a pinned post in the feature-style layouts to explain their mission and encourage new visitors to sign up.
Step 6: Save your customizations
Once you are happy with the look and feel of your publication, save your work and get back to the more important job of creating high-quality content for your subscribers.
You can change the layout, colors, fonts and pinned posts any time you like, nothing is set in stone.
Final thoughts
If you’re new to Substack publishing, my best advice is to:
Deactivate the ‘Match Profile’ setting that is the default for new publications. This will allow you to control the name, description and logo for your publication.
Upload a logo and change the ‘Accent color’ (button color).
Pin a ‘Hero post’ to your homepage so visitors can easily discover what your publication is all about with just one click.
Forget all the other options for now; there’s no need to spend hours on background colors, fonts and layouts; the Substack ‘Custom theme’ default is pretty good.
Remember that ‘design’ decisions are a top procrastination activity for creators! It’s more important to create and publish awesome content than have a perfect website.
Need more help?
Get 60 minutes of my undivided, honest advice and ‘how-to’ guidance here: Substack Strategy Session (60 min) | Zoom Call with Karen
Talk soon!
Karen